Showing posts with label toy. Show all posts

Monday, August 23, 2010

Felt Choosing Cubes

(This past 3 months!) I’ve been subbing for the Primary Chorister.  I made these little cubes to try to motivate the children in Primary to #1 be quite so I would pick them #2 have reasons/variations to repeat a song and #3 because felt does not get destroyed as fast as paper does  and #4 it’s a sneaky way to teach musical terms. 

You could use these cubes for other motivation, such as which chore to pick for the day or what kind of activity to do when your children are arguing…there are so many possibilities!

002

The kids LOVE it when I pull these out!  So glad I came up with them!

Here are some of the different things I put on them:

Red:

Leave out a word

crescendo (grow louder)

decrescendo (grow softer)

fermata (hold a note)

rall.  (slow down)

accelerando (speed up)

Yellow:

Staccato (short and bouncy)

Largo (smooth)

Legato (slow)

Forte (loud)

piano (soft)

allegro (fast)

Blue:

Boys only

Girls only

Right side (of room)

Left side (of room)

No teachers

Hum

Cheap Baby-Doll Bed

If you ask my son what he wants to be when he grows up, he will tell you quite frankly “I want to be a daddy!”  He loves babies and kids and he’s always asking if we can have 20 kids in our family…of course my response is always “Nope!”  He has a baby doll that he got when he was almost two and in that stage where all that little toddlers love babies. 

When his baby sister was born last December, my mom came to visit laden with matching items such as blankets and pajamas for his baby sister and his baby doll.  It was very thoughtful of her.

There have been many times when my laundry baskets have been confiscated by Christian to use as his baby’s bed.  Until one day after a visit to Sam’s Club when I realized that one of those dumb half/cardboard box things they give you to load your giant items into was about the perfect size and shape for a baby bed.

So, Christian picked some paper that he liked and I mod-podged  the thing and made a cushion.  Now it’s a very cheap baby bed that I won’t feel guilty about discarding when his love of his baby doll has bid its last farewell and I can use the cushion as a toddler pillow for one of his sibling(s)…

009

Thursday, May 27, 2010

Infant Play Mat Combining Functionality and Design…

One of the things that I indulge in way too frequently is watching HGTV.  I don’t love all the shows, but I think the real problem is that as the ability to buy a house is approaching, I’m completely enamored in the idea of knowing what I want to do with my someday home.  Good grief, I’ve wished for a home since I was 14 and I asked my mom why she did something a certain way and she said “You do it your way when you have your own home”.  My favorite shows have designers staging or redecorating (I love “Divine Design”!).  Jared is a HGTV addict too but he’s much more interested in Holmes on Homes and the Home Buyers shows. 

One of the common threads that I’ve found in all this TV watching is that a lot of parents let their children’s toys overtake the main rooms of their homes.  In my parent’s home toys were banned from the front room.  This is fine and dandy if you have a family room as well as a living room.  But for those of us who have less space it’s tricky.          

I came up with a wonderful solution… I designed a tummy-time play mat that uses the colors of my front-room and is a piece of art—using a bold contrasting pattern while mixing patterns and not being too garish—a visual delight.  I used a combination of cotton, velvet, valor, and faux suede to indulge the tactile sense. The leaves make crackle noises while the centers of the flowers squeak.

IMG_4342

Now my baby can play on the floor in happiness with lots of stimulation and my room still looks organized and modern.  I’m considering opening up an on-line shop to sell these.  I would customize them to match the colors of the room that they were made for (not necessarily the nursery colors).  What do you think?  Would you pay for something like this?  Or would you rather have a pattern and make your own? I am planning to design some that are more gender-neutral/masculine as well if this idea is well-received.  If you do like it, what would you pay for something like this? 

IMG_4361

Constructive comments would be very welcome.

Friday, May 7, 2010

Make-believe Sheath or Scabbard Tutorial

So Christian has ruined a belt and two ribbons that he has tied around his waist and used as a sheath while playing prince and so I promised to make him a sheath or scabbard.  I think it turned out rather well.  I think the next time I try this I’d like to try real leather though because the nature of his play is a little rough if you know what I mean.  He loves his sheath and it’s the thing he always has on at home if he’s not asleep. :)

IMG_3038   

It wasn’t too difficult though I wish that my eyelet’s worked better…they didn’t set well into the material so they turned out to be just holes but they look pretty cool if you ask me (the holes I mean).  It gives it a rustic look.  I’ll get more heavy-duty eyelets made for belts next time.

Materials Needed:

Sword (for measuring)

1/4 yd faux-leather/decor vinyl or other sturdy material

thread

heavy-duty needles

scrap of contrast material


Method:

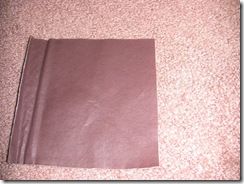
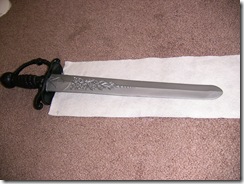
1. Place sword on material and fold over.  Leave at least 2 inches on each side of the sword.
 IMG_2678  IMG_2680

2. Fold bottom portion of scabbard in half and round off with scissors.

IMG_2681

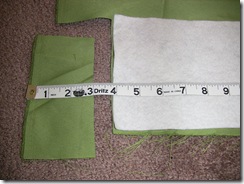
3. Measure contrasting material to match width of scabbard and cut to be 3 inches long.IMG_2682 IMG_2683
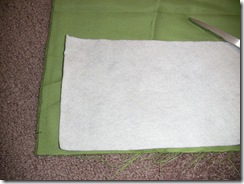
4. Fold bottom edge of contrasting material 1/2 inch.  Press.
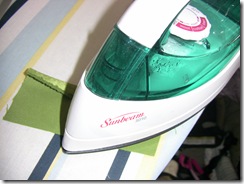
IMG_2688

5. Pin Contrast over top portion of scabbard.
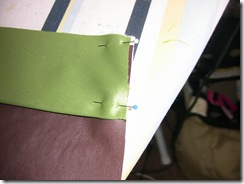
 IMG_2689

6. Sew in place using a decorative stitch if desired

 IMG_2691 IMG_2692

7. Cut remaining material to be 6 inches wide and 5 inches longer than waist intended for (i.e. waist was 20 inches so cut material 25”x6”).

IMG_2693

8. Cut a piece that is 6x5 for loop.

IMG_2694

9.  Mark belt starting 2” from edge every inch for four inches.
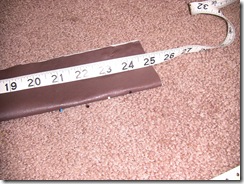
 IMG_2695 

10. Sew in female side of snaps at markings.
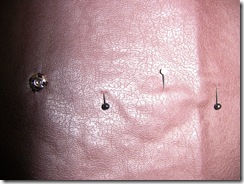
  IMG_2698   

11. Fold Belt in half and then overlap  (as a belt does) and mark where male side of snaps go across from female snaps.  Sew snaps at markings (no photo).

12. Should have all three pieces prepared.  Can embellish by adding eyelets, grommets, or holes. 

 IMG_2705 

13. Fold over top edge of scabbard and sew in place (can use a decorative stitch if desired)

IMG_2707 IMG_2708

14.  With right sides together fold scabbard in half and sew along the side 1/2” away from edge. IMG_2709 

15. Fold belt portion in half right sides together sew 1/2” along edge. Turn over.
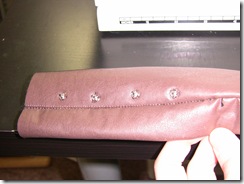
IMG_2725

16.  Fold in outer edge and hand sew with a heavy duty needle about 1/8” away from edge (this is very thick). IMG_2726

17. Sew top and bottom portion to area of belt desired (depending if you want it to snap in front, the side, and if it’s for left or right handed use).
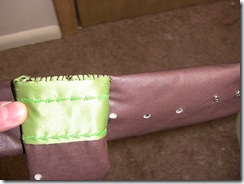
IMG_2727

18. For loop portion, fold in half right sides together so that it measures 6x2 1/2 inches.  Sew 1/2” from edge. IMG_2728

19.  Turn out.  Sew raw edges together 1/4” from seam.
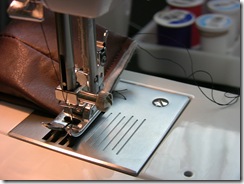
 IMG_2729

20.Turn and slide onto belt.

 IMG_2731 

21. Tada!   You’ve got a great accessory for your little prince, knight or solider!  IMG_3037
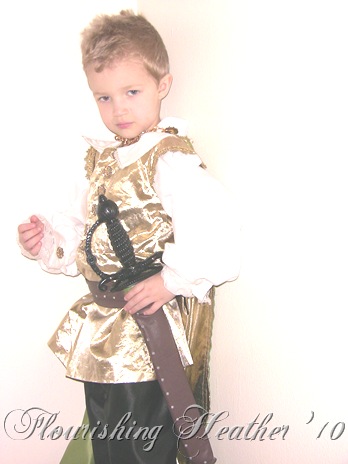
 

I just love this little guy.  He’s so expressive and isn’t he just totally made for drama?

Wednesday, February 17, 2010

Busy Book—Preschool Skills

I finally finished my “preschool skills” busy book. It kept getting pushed aside for other projects but after seeing it on my “projects pending” list for WAY too long, I finally gave it top priority and finished it in a couple of days. Here it is in all its homemade glory!

 Cover

I did the cover in this cute understated material that contrasts with the cover of the other busy book that is still colorful and fun.  I love the snap closure because it makes it less likely to “drop” its contents.

IMG_2418


Alphabet pages

I wanted to use these cute buttons I found for maybe $1 on a Joann’s Clarence rack.  So I had the brilliant(?) idea of using them as the labels for my shape pages.  I traced cute pictures onto white muslin and then afterwards realized that iron-on transfers would have been soo much easier…oh well, you live you learn.

IMG_2419  IMG_2420

IMG_2421   IMG_2423


Shape Page

This was a fun page to create though (of course) now I have even more ideas that I could have used.  This is one of Christian’s favorite pages, I think it’s great that he knows what a parallelogram is!

IMG_2424


Number pages

This is very similar to the alphabet pages except that this one is numbers.  I found some very cute brads from Oriental Trading Company that I used for the “tallies”. It would have been nice to have this ready a couple of months ago because Christian is quite good at recognizing numbers already.  It will be useful when Vivian is ready for it.

IMG_2425IMG_2426


Addition page

This idea was taken from one of the many other busy books I looked at online when I was trying to think of ideas for my busy books.  Yes, there is a stain on it from fabric markers leaking when a certain three-year old was drawing on a paper above this.  This is my least favorite page but it’s pretty fun to watch Christian figure out the sums.  Plus it does familiarize him with math notation at a young age so it won’t seem quite so foreign when he first sees it in school.

 craft 001


What’s the Weather?

This came from my memory of a chart that my mom had on the wall for years in our playroom.  It was always fun for me when I was small to look outside and figure out what the weather was for the day and mark it with the hands.  I think that the idea originated from the Joy School manual. It’s my done in my own scribble with fabric markers so I’m sure it could be much cuter.  


craft 002


Season and Calendar pages

This is the page that was the most intensive to put together.  I had caught on to the iron-on transfers by the time I reached this page so that wasn’t the problem.  It was the bazillion squares that needed to be sewn around.  So basically I put it away and hadn’t pulled it out for a while.  Guess what though? It really wasn’t that bad.  I sometimes get so intimidated by things that really are not so terrible once you get into the swing of things.  I did myself a favor with this page though and bought the sticky backed Velcro rather than sewing it on…it just worth my sanity to do that many squares! This us by far Christian’s favorite page. Of course, it is the most advanced page and much more on his level so that accounts for it but it’s pretty fun.  All the pieces on the Seasons page are pretty much movable except for the Winter, Spring, Summer, and Autumn labels.  I thought of doing it by the year but I felt that learning the seasons and the months in them was probably more easily grasped for preschool age children.  It’s funny what interests kids because Christian has a blast just putting the numbers in order starting with the one on a different day.

IMG_2429


Tick-Tack-Toe Game page

Here is Jared’s favorite page.  Funny huh?  He keeps trying to talk Christian into playing Tick-Tack-Toe (rather than Life which is the game Christian always wants to play) with him.  I think it’s hilarious.  As you can see, I made it with my boy in mind who’s favorite everything at the moment is green… I did a survey the other day for Fisher-Price and I was supposed to ask my child what picture they liked best.  Of course he picked the picture with the most green.

IMG_2430

I’m so glad it’s finished.  It would have been nice to have finished it last year for a 3-year-old but it still is entertaining for a 4-year-old.         

Sunday, February 14, 2010

Felt Roll-Up Kitchen

Around Christmas time I became intrigued with the idea of making felt food so I searched the internet like crazy for ideas (only to find shortly after that my mom was gifting fake food for Christmas).  In my searching I found this blog called Balancing Everything with a darling pattern for a felt roll-up kitchen!

Of course I had to add my own little touches which I did by embroidering the coils on the burners and adding words to the knobs and putting in a drain (what’s a sink without a drain?)

IMG_2392


Here it is in all it’s embroidered glory!

IMG_2389


It’s such a great idea and is totally portable so Christian can play with it on practically any flat surface and at the end of the day it rolls up for easy cleaning!

IMG_2394

Most importantly, Christian Loves it!  

Friday, February 12, 2010

Noah’s Ark Play Mat

One day in December when I was searching around the internet insanely finding more projects to try.  I found this darling pattern for a Noah’s Ark Play Mat at  www.freepatterns.com to make out of a blanket with some felt pieces and then some felt finger puppets to go along with it.  I of course was a little disappointed that there actually was no Noah included (or his wife either) so I made my own pattern up for both of them and then when I found some awesome striped chenille pipe cleaners I decided to make my own pattern for the tiger as well.  I also took this pattern to the next level by sewing everything rather than gluing it as it says to in the instructions.  It would have taken a lot less time if I had glued. I made two of them, one for my niece who just became a big sister and one for my son who just became a big brother. It is much more durable than it would be if glued and hopefully will provide hours and hours of fun play for both of them and maybe their siblings too.

   IMG_2249

Here’s the ark.  If you look at the pattern, I changed pretty much everything about the color scheme but I like mine better.

IMG_2251 

Here are the finger puppets.  Very colorful I must say.

IMG_2247

Here’s everything together.  I really think they turned out cute!