Tuesday, January 24, 2012

Damask Bow Frame

Thanks to my sister-in-law, Megan, I was introduced to Pinterest in October.  However, I didn’t really take the time to figure out how to add my own boards and such until this past month when on New Years day, I had extra time to myself with the lap top AND my hubby was at home.  What a fun tool!  I’ve been enjoying all the great ideas for crafts.  One of the fabulous things I’ve seen is for ribbon holders.  Such as this or this…I prefer this one though.

I was so excited about these holders, that last week, I stopped by Goodwill and picked up a frame  for super cheap that didn’t have any glass.  It luckily had a double thickness of cardboard, which is what I needed.  I used my trusty can of white spray paint to make it match Vivian’s room, and this is what I made:

IMG_1178Here it is with a few of her bows on it so you can still see some detail….IMG_1179

I love it!  I was able to use a scrap of material that I ABSOLUTELY adore that I don’t have much left of  wanted to use again in Vivian’s room and can’t find any more of at any of the nearby stores (the shop I got it in is in Scottsdale).  I realized once I started that I didn’t have as many ribbons in these colors as I had thought.  But I decided to use what I had instead of running out and buying more.  I think my thriftiness paid off because I am really enjoying my creative use of ribbons to make it look more than just functional but actually a bit artistic.

Friday, January 6, 2012

Ladies Only: Craft Night!

With the exception of December, I’ve been holding a craft night on the third Friday since school started.   It has been a really fun excuse to get some girlfriends together and just work together on our many projects.  I’ve also had fun thinking of different ways to “tweak” my spread.   Here are the different months of what my spread looks like.  August is the first month and I went a little nuts with the food and had so much left-over that I have since scaled back on the treats. Winking smile

AUGUST

IMG_9665


SEPTEMBER

IMG_0141


OCTOBER

IMG_0299


NOVEMBER

IMG_0548

I really love having an excuse to use the season as a theme for an “event”.  I’ve just had the ladies bring their own projects that they need to work on, but I’m wondering if I should have the option of a pre-designed craft for those ladies who don’t think that they are as “creative” (though we all know that’s not really true).  What do you think, would you rather go to a free-for-all craft/scrapbooking night or something where a specific craft is taught?

Thursday, January 5, 2012

Lasagna with the Slow-cooker

I love the slow-cooker.  Living in Arizona has pretty much made the slow-cooker my best friend since it is the one thing that really keeps the heat down in the house in the summer (which also helps keep the electricity bill down too).

The one thing about the slow-cooker that bothers me is that if you don’t pick your recipes carefully, everything ends up coming out looking like a big pile of mush.  Yuck!  So when I noticed that there were actually two recipes for lasagna in my slow-cooker recipe book, I was VERY nervous to try one because it was difficult to believe that this:


Could possibly make something that looks like this:

MP900182714[1]

Of course, the presentation was not as lovely as this, but the taste was delicious.  Sadly, I did not get a chance to take a photo before my husband and children devoured it while I was teaching piano lessons (which is the reason I needed to use the slow-cooker anyway).  I think the presentation would be much nicer if it was covered with an extra helping of cheese as it was plated and then perhaps fresh basil or parsley but that’s just an extra.

I tweaked the recipe that was in the book a lot but not the method so here’s my recipe for slow-cooker lasagna. 

Slow-Cooker Lasagna

for a 4-quart slow-cooker

One 8 oz. package of Lasagna noodles

1 lb. ground beef

1 onion, chopped

1 green pepper, chopped

2-4 cloves garlic, minced or crushed

1-2 4 oz.  jars sliced canned mushrooms, drained

6 cups of tomato sauce (I used homemade I had frozen but you can used the cans, 8 oz. = 1 cup)

1 tsp. ground basil (or 1 Tbs. fresh)

1 tsp. thyme (or 1 Tbs. fresh)

1 tsp. oregano (or 1 Tbs. fresh)

1 tsp. salt

1/2 tsp. pepper

4 cups shredded mozzarella cheese

1  1/2 cups ricotta cheese (or you can substitute and use drained cottage cheese)

1/2 cup shredded parmesan cheese


Method:

In a large sauce pan, brown ground beef when almost browned drain, add the onions and green pepper and mushrooms  cook until soft then add garlic for the last minute or two to avoid over-cooking.  Add spices and stir, then add Tomatoes sauce allow to simmer and remove from heat.

In a separate bowl combine mozzarella, ricotta (or cottage cheese) and parmesan.  Stir until combined.

Divide lasagna noodles into three equal piles.

Layer:

In the bottom of an ungreased slow-cooker, spoon 1/4 of the sauce on the bottom.  Top with a layer of noodles.  I broke each noodle in half and turned them to try to cover the circumference of the cooker.  Top noodles with 1/3 of the cheese mixture and another layer of 1/4 of the sauce.  Repeat layers two more times.

Cook in slow-cooker for 4-5 hours on LOW.

Because the noodles are layered this way, they don’t taste under or over cooked but just right and the flavors of the cheese and sauce merry nicely because they are cooked together for such an extensive time. Enjoy!

Tuesday, November 1, 2011

Having a “Crafty” Halloween!

This Halloween, I seriously went a little crazy.  Because it was a Monday and Mondays always make me feel like I can conquer the world and do it all, I decided to paint the front door.  You have to understand, I live in Arizona in a neighborhood full of “cookie-cutter” stucco houses that are supposed to “blend in with the environment”  that environment basically is a variation on taupe… which in my book is a little boring.  Someday, I hope to live somewhere that has cape-cod style houses with wrap-around porches and big lush green growing things everywhere.  But as it is, I am subjected to the HOA who has bi-laws about what your front exterior looks like.  So I did the most daring thing I figured I could do and that was to paint the front door in Benjamin Moore’s Toasted Chestnut which in the store and indoors looked a little too crazy and dark, but in the totally saturated light of Arizona it looks fabulous!

Before                                                                    After

IMG_0323IMG_0329

The first photo is what my front door looked like that morning and the second photo is after I fished replacing the hardware before I picked up my son from school that same afternoon.


When I got my son home from school that Afternoon the kids and I got to work making Halloween-Themed food so that they would at least have something that wasn’t candy before I took them out trick-or-treating.  We made goblin flatbreads an idea from Martha Stewart’s website, as well as Mummy Dogs that I painted faces on with edible markers.  Here is the pan that I took a photo of and sent from my camera to show my husband the fun he was missing (I was trying to encourage him to get home soon so we could go trick-or-treating and he could man the door).  One of the flat-breads didn’t fit on the other try so we stuck it on the edge of this pan.

mummy hot dogs

We served the flat-bread with marinara sauce and the hotdogs with ketchup; both of which made these snacks seem extra gory!  The kids enjoyed them though.  Here are photos of my 5-year-old boy and 18-month girl enjoying their snacks.

IMG_0331IMG_0333IMG_0337

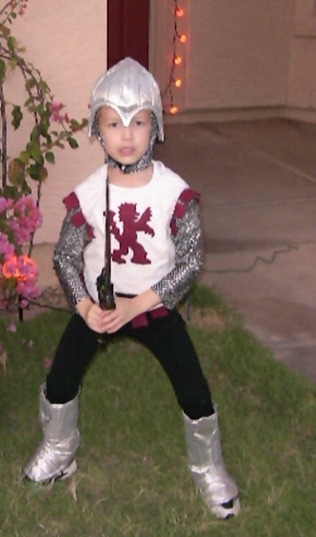
After our snack, I had them dress in their costumes and try to take photos in the ever-darkening night…part of the reason these didn’t turn out like I hoped (the other reason was that the kids were so excited they pretty much wouldn’t hold still.

IMG_0338

Yes, I made my girl’s costume and no, I didn’t even think about the fact that every other girl in the whole neighborhood was going to be dressed up like Tangled.  This is just my little girl as a damsel in distress and my gallant little boy who wanted to be a knight in shining armor (again).  I didn’t make him a new costume though I probably should have looked at it on him to make sure he hadn’t outgrown it before Halloween…. he wears it all the time to play pretend in, but I didn’t notice how little it was getting on him until I actually took the pictures.

IMG_0354

Here is his favorite “tough guy” stance….too funny!

IMG_0363I have had the most difficult time getting this girl to look at me when I pull out the camera, let alone stand still.  When I asked her to hold still for this photo, she knelt down on the ground and folded her arms.  I couldn’t help but laugh and take a photo since she probably learned this skill in nursery recently.

Here’s my newly painted door complete with a wreath that night.IMG_0380Here are the cute pumpkins my husband was so sweet and carved for us (I get way too nervous with knives to attempt this).  The jack-o-lantern face was designed by my son who even wrote out cute step-by-step instructions for my husband to follow in order to get the desired results.  The spider was from one of those kits you get from the grocery store (it did lose one of legs but my ingenious husband figured out he could re-attach it using a straight-pin).IMG_0381IMG_0384

I hope you all had a Happy Halloween!

Wednesday, June 29, 2011

Kindergarten Graduation Cake

I was thrilled at the end of May when my friend and next door neighbor asked me to make a cake for her son’s kindergarten graduation that served at least 76 people. 

I was a little concerned about the size I would need to make it in order to feed that many, so after looking at design ideas and figuring out servings for a few days I decided to make a cake that is similar to this one I found on the Wilton Cake website called “Tomorrow’s Stars”.   I did mine in the school colors and of course, it’s not exactly the same.  Their’s is pretty cute but I must say, I think mine is cuter. ;)

IMG_8653

I realized as I was making the little fondant people that for some reason I could not for the life of me find a gingerbread girl cookie cutter in my 101 cookie cutter set that I got for my wedding from someone who must have had great foresight.  Now I’m wondering if the older version’s of the set don’t include a girl.  If not that’s sexist isn’t it?! ;)

So, I had to compromise and kind of “create” the bottom of the people by using a knife and other cutters I had to make them work without having to go out and buy more supplies.  I totally did not break even with this cake so I’m starting to re-think ever using ideas that aren’t my own as a basis again!  Whenever I make a cake idea from a company I always seem to spend WAY more than I wanted to.

I think it did turn out pretty cute though despite having to improvise.  Because I had to make 15 children I made them all different.  Here are some  close-ups:

The front:

IMG_8651 

The left side:

IMG_8655

The back:

IMG_8656 

The right side:

IMG_8658 

A little more to the right and around to the front a bit:

IMG_8659

I really had a fun time making this cake.  I had my own little emergency during it (like a trip to the doctor for an x-ray) but despite all that, I think it turned out pretty cute.  I really wish my people hadn’t basically melted because I tried to keep them but they turned to mush… Oh well, it was joyous to watch the kindergartener’s and their delight at this cake for them and there was pretty much a character on the cake that looked similar to each classroom child…The one little blonde girl in the class actually begged (and got permission) to take the little blonde girl home which I thought was sweet.