Showing posts with label baby. Show all posts

Friday, January 14, 2011

Baby Girl’s 1st Birthday!

First of all, I have to say that a birthday for me is generally not a one-time event…it can easily be a couple of parties to make up the whole “birthday”.  I think this comes from being in a family that would have a party on each of the grandparent’s side and then our own little celebration on the day.

I was so excited to have a girl (not that I don’t love my little man) I have always wanted to go all out on the girly theme…so that’s exactly what we did.

IMG_6815

For the beginning of our celebrations, we were visiting family in Utah for Christmas and my baby girl’s first birthday is four days after Christmas, we decided to have a party while we were there.  I made royal icing roses before we left for our trip and kept them in a shoe box lined with tissue paper until it was time to use them.

I also insanely decided to make a banner for her the day before we left too just for some more pizzazz.  No I don’t have a machine to help me cut out letters so I did it the old-fashioned way…printing out letters on my computer and then cutting them out by hand.

IMG_6800

I did do one clever thing with the banner though and that’s to put eyelets in all of the holes I made.  This way, my banner is totally re-usable and if I so desire, I can trade out letters for a different color or whatever! I glittered each letter with fine white glitter which was a nice little mess but I think it gave the sign another needed dimension.  I also added the circles with little faux flowers with “gemstone” brads in the middle as spacers when I realized that it’s kind of tricky to read when there’s no spaces (this came from looking at a note my 4-year-old was writing as I was making this that had exactly the same amount of space b e t w e e n  e v e r y l e t t e r and I realized I was doing the same thing).

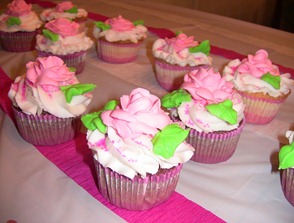
I decorated the cupcakes the night before the party (which was Christmas) while everyone was watching a movie so they were totally ready the next day when we were ready to set up.  I choose to do them in lemon and filled them with raspberry and then chocolate with chocolate pudding (I hid them in the laundry room…it seemed to work to keep them out of little children’s prying fingers and little lips).
IMG_6910

All I did was what I call the classic “twirl” with a large star tip, sprinkled with sugar crystals, plopped a rose on top and finished with a leaf for a little more color (I was considering monochromatic but I think it would have been a little less appealing with a bright pink leaf).

I arranged the cupcakes in the shape of a “1” a little trick I learned from my friend Charisse.

IMG_6818

That party was very fun.  I love having parties with family, they always keep things interesting. :)

For the real day which was three days later and the day after we got home from a VERY long drive.  We set up the sign over my girl’s chair and then I made homemade buttermilk pancakes for dinner.  After dinner she got to open a gift from us.  Not too elaborate but I was exhausted!

  IMG_7002

Our little birthday girl!

IMG_7056

Hubby also brought her home some roses…she didn’t get it but maybe someday she will.  The vase I had was a little short so I had the brilliant idea of filling it with river rocks…I really like the effect.

IMG_7061

The next celebration we had with our friends who live here in AZ.  I actually did make a cake for this with some of the better roses left from her UT party.  I also colored a bit of icing and made the darker roses for some higher contrast.

IMG_7111

Here’s a view from above…

IMG_7051

I need more practice I know but I thought it was pretty cute.

IMG_7067

I really thought the one candle on the top was pretty funny.  I could not find one single “1” candle at any store I happened to go to.  I wonder if everyone was putting 2011 on their cakes that week or something!

Thursday, January 13, 2011

Simply Darling bows!

When my baby girl had her first birthday a couple of weeks ago, I was really excited by the darling new hair bows that my good friend Charisse and her girls gave to my daughter from her shop.  She has the cutest bows and now that my girl has enough hair to put one directly in she actually keeps them in (at least for a while).

IMG_7202

I love this little butterfly bow!  It’s so cute it is for sure my personal favorite!

IMG_7204  

What the heck! Here’s a picture of my cute girl from this morning while we were working in the yard.  I love this little outfit from Carters….the little ruffle detail on the blouse is darling!

Tuesday, November 30, 2010

Winter Baby Boy Bear Cake

The Saturday after Thanksgiving, I helped throw a baby shower for my friend Sherrada who’s having a baby boy.  Her sister Kalei and I threw it at my pretty much empty house since we more than doubled our square-footage when we moved and  do not yet have much furniture downstairs and though I have some ideas what to do, I’m not completely sure what colors I want in those rooms yet.  We had a spread of veggies, fruits, cheese and crackers and meats and some sweets Kalei brought and then I made some breakfast casseroles: a baked French toast one and two different egg ones.

I also practiced by piping skills the night before by making a polar bear cake with a bow-tie the night before.  I love the 3D mold I used for this bear.  I bought it a while ago and was excited to try it out.  I think it is tempting me to buy a tilting cake turner so that I can get the detail better on the bottom when I make it again.  I used tip 233 for the fur because I absolutely love the fuzzy look it gives the bear….much cuter than stars in my opinion.

029Here’s our “Brunch” spread.  Kalei brought such yummy things.  It was great that I had her help with the food! 030 Here’s the detail on the bear.  It’s difficult to see the fur and it probably would have been cuter if I did it in brown but I wanted to have white butter-cream since it was a spice cake to go with the holiday season.031    Here’s pretty Sherrada filling out a paper for one of the games.

038

This is her mom getting ready to guess how big (actually little) Sherrada’s belly is.

040 One of Sherrada’s husband’s  aunts made this with regular grocery bags from the store.  I thought it was such a great idea, I had to take a photo so I can steal her idea.  She mentioned that using lunch sacks with the same idea makes a really cute bag for little cookies or something.  Love it!042

Here’s Kalei with her brand new baby and Sherrada with her darling baby-belly.  So much fun that these sisters are having babies around the same time!

Baby Boy “Bear” Shower

I haven’t been blogging much lately, but that doesn’t mean that I haven’t been up to anything.  In fact, in the last three weeks, I’ve thrown two baby showers, hosted Thanksgiving and in between all that partying/work, our family moved and I have begun the task of painting and decorating each room.  Here are some pictures of the shower I helped throw for my friend Claudia on the 4th of November.  Her little boy showed up yesterday, so it’s about time I put up the pictures.November pics 2010 086 My friend Brooktynn, who’s house we had the shower at thank goodness because I was moving the next week and my apartment was decorated with cardboard boxes from the grocery store, made this cute sign above the buffet table.  I loved that cute paper she used I wish it came out better in the photo.November pics 2010 089

Here’s my darling friend Claudia in all her glowing motherhood glory.  She is so cute!November pics 2010 087 This is a photo of the spread.  Claudia’s been on a fruit and veggie kick since she got pregnant so I thought it would be appropriate to have Crudités and various dips, along with some wraps and French bread for dipping as well.  We had Hummus, Babba Ganoush,  herb vinaigrette, ranch and artichoke spinach dip for the dips along with broccoli, cauliflower, peppers, cucumbers, carrots, olives, tomatoes, baby corn and snap peas and a bowl of mixed fruit.  It was delicious and a pretty easy spread to put together.  The trickiest part was transporting it all to Brooktynn’s house. November pics 2010 088

Here’s the cake I decorated.  It has a mini bear on the top to honor little baby bear (that part was actually a brownie since who wouldn’t rather have a brownie than cake?).  The bottom cakes were white with strawberry preserves for the filling since strawberries are Claudia’s favorite.  It was delicious if I do say so myself.

We didn’t play any games (at Claudia’s request) but instead we put together scrapbook pages that Claudia can just add photos to since life gets pretty hectic once the baby actually arrives and that’s when you need it done, we thought that would be fun.

It was a little crazy to give a shower the week before a move but it was great fun and I’m glad I did it!  I hope Claudia enjoyed it too!

Tuesday, October 19, 2010

Halloween Costumes 2010

This years costumes are finally finished!  I’m so excited to show them off!  I know they’re not as amazing as the costumes that some people make but I think they’re pretty cool.

The first costume I decided to make was armor.  It actually took some convincing because my boy wanted to be a prince.  But since I pretty much made a prince costume last year (in a way) I really didn’t want to have to do the same thing again.  So I put on my best sales-woman approach and pulled out our “Narnia” collection book and sited all of the pictures that “The high King Peter” or “Prince Caspian” wear armor.  It worked!  He wanted armor after that.  The funniest thing about the whole scenario is that he still wants to be called “A prince, in armor”.

at home 016 

Here he is, looking fierce!

at home 047

I love his stance!  So tough!

And because I never know when to quit….I also made some other accessories to make his costume more versatile.

at home 044

Gritting his teeth with determination.

Now for the part that I’ve been waiting for my whole career as a mother!  My little girl’s outfit!  I have been wanting soooo badly to embellish clothing with glitter for years so I went all out and went crazy!  (Some of the material actually came glittered already, which was helpful ;) ).

And here she is, my little Fall Fairy:

at home 019

I’m so happy she kept the headband I made on.  The trick was to tell her how pretty she looked the second I put it on and push her hands away from trying to take it off.  I’ve had to do that every time I’ve put it on her, but it seems to work. 

at home 021

Back wing view!

at home 027 

Side view of her dress.  I loved the little petals on this pattern…thus why I had to make it when I saw it (besides that it came in 1/2 size….not many patterns this cute do!)  

at home 033   This one is just adorable to me!  I love her sweet little face and her pretty blue eyes!

So yes, I went a little crazy, and a little over-board.  But the point is, I’ve also had a LOT of fun. :)

Thursday, May 27, 2010

Infant Play Mat Combining Functionality and Design…

One of the things that I indulge in way too frequently is watching HGTV.  I don’t love all the shows, but I think the real problem is that as the ability to buy a house is approaching, I’m completely enamored in the idea of knowing what I want to do with my someday home.  Good grief, I’ve wished for a home since I was 14 and I asked my mom why she did something a certain way and she said “You do it your way when you have your own home”.  My favorite shows have designers staging or redecorating (I love “Divine Design”!).  Jared is a HGTV addict too but he’s much more interested in Holmes on Homes and the Home Buyers shows. 

One of the common threads that I’ve found in all this TV watching is that a lot of parents let their children’s toys overtake the main rooms of their homes.  In my parent’s home toys were banned from the front room.  This is fine and dandy if you have a family room as well as a living room.  But for those of us who have less space it’s tricky.          

I came up with a wonderful solution… I designed a tummy-time play mat that uses the colors of my front-room and is a piece of art—using a bold contrasting pattern while mixing patterns and not being too garish—a visual delight.  I used a combination of cotton, velvet, valor, and faux suede to indulge the tactile sense. The leaves make crackle noises while the centers of the flowers squeak.

IMG_4342

Now my baby can play on the floor in happiness with lots of stimulation and my room still looks organized and modern.  I’m considering opening up an on-line shop to sell these.  I would customize them to match the colors of the room that they were made for (not necessarily the nursery colors).  What do you think?  Would you pay for something like this?  Or would you rather have a pattern and make your own? I am planning to design some that are more gender-neutral/masculine as well if this idea is well-received.  If you do like it, what would you pay for something like this? 

IMG_4361

Constructive comments would be very welcome.

Wednesday, March 31, 2010

Baby Girl Blessing Dress

As it turns out there is a nice learning curve to sewing.  When I made this dress I had never been very successful  making anything wearable before.  According to my friend that I gave it to it has received more complements than all of her daughters other dresses.  I thought that making Vivian’s blessing dress would be a difficult undertaking but it actually only took me about two days: one to cut and sew most of it and the second day for the finishing touches.

Here’s Vivian sitting on Grandma’s sofa on her blessing day.  I really love the ivory brocade satin that I found and the gorgeous Venetian lace that I found to trim it with.  I also got creative and made a pleated bow for her head since the bonnet  seemed a little overpowering for her little sweet face.

  IMG_2926 

Here she is with her daddy ready to go get blessed.      

IMG_2936 

It’s a little difficult to see the bow detail because of the lack of contrast but I’ll make another in color at a later date and do a tutorial if anyone is interested.

IMG_2932

Here’s a pretty fuzzy though cute picture of her big brother trying to kiss her!

Thursday, October 1, 2009

Newborn Baby Bracelet

When I made the green bracelet a while ago I cut the cord a little too short so I decided to make an infant bracelet.  The standard size for infants in 4”- 4.5” so I just made it 4”.

 IMG_1239

Saturday, September 12, 2009

Darling Baby Bibs!

I love these baby bibs…These are some more things that I made using ideas from the the book “Sewing Projects in an Afternoon” by Susan Mickey.  These are nice because they are actually thick enough to ensure that what the baby is spilling on themselves is not going to soak through (if you can bear for your baby to wear these while eating).  The bunny is probably the best for eating in because it is actually all made of terry cloth in the front which will keep it nice when washed.  I’m not sure how the fleece on the bear and duck will do.  Next time I hope to find a larger variety of terry cloth colors…or I’m just going to have to buy towels to make these with!

  February to May 047  

White bunny on yellow

  February to May 052 

Yellow duck on white

February to May 053

Brown bear on purple